A SUSHI BUFFET IN YOUR OWN HOME
This is a project that I’ve been wanting to do for quite a while. The last time that I made sushi, I was a TL for a Chinese School summer camp, where one of the classes they were taking involved how to make California rolls. In the years since then, I can’t even count the number of sushi rolls I’ve eaten. From Rainbow Rolls to Dragon Rolls to Spicy Crunchy Whitefish Rolls, it’s always a blast to sample new specialties at different Japanese restaurants. After hearing about the availability of sashimi-grade fish in some of the local Asian markets, I went out to buy the ingredients to give it a shot. Also note that you’ll need a good sushi mat to make doing the rolls a lot easier. I’d recommend the mat that I used. It has one flat side and one rounded side and did the job really well.
-

- A closer look at the rolls.
-

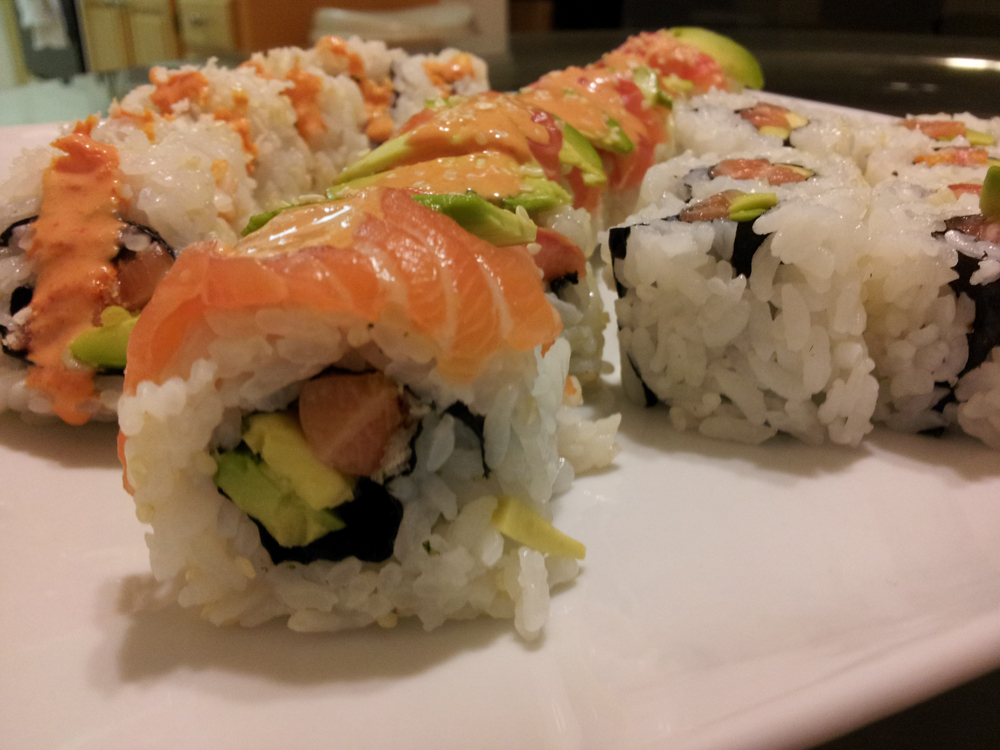
- Three different rolls, all with the same core ingredients of salmon and avocado.
-

- Sushi rice takes time to make, but getting it right is the key to good sushi rolls.
-

- The concoction station for making the spicy chili sauce.
Salmon & Avocado Sushi Rolls
Makes about 22 – 24 pieces (4 rolls)
Rice:
~ 1 cup Nishiki rice (sushi rice)
~ 2 tbsp sushi rice vinegar
~ 1 1/3 cup water
Sauce:
~ Equal parts Japanese mayo and Sriracha sauce
Main components:
~ Seaweed sheets
~ Sashimi-grade salmon
~ 1/2 avocado, cut into strips
~ 1/2 cucumber, julienned
~ Panko breadcrumbs
~ Sesame seeds
Preparing the rice:
- Start off by putting your sushi rice into a bowl and then filling it about halfway with water. The water will start to get cloudy; this is just the rice’s starch coming out and mixing with the water. Rub the rice in the water and then drain out the cloudy water. Repeat this process until you can almost clearly see the rice through water (after you’ve rubbed it a little bit).
- Put the rice into a saucepan and fill it with the 1 1/3 cup water. Let that sit for a half hour so that the rice can absorb it.
- Once the half hour is over, cover the saucepan and heat it up on high. Turn it down to a simmer on low once the rice and water inside start to boil. After 15 minutes, remove the saucepan from the stove, use a fork to fluff up the rice a bit, and set it aside for 5 minutes. I opened the lid to let the excess steam out and have it cool down a bit. I’d recommend this, since the sushi rice needs to be around room temperature before you can work with it anyhow.
- After the 5 minutes is up, transfer the rice out of the saucepan and into another large bowl. Once it’s all there, throw in your sushi rice vinegar. I was able to find Nishiki sushi rice vinegar imported from Japan at my local Asian supermarket. However, if you can only find regular rice vinegar, make your own sushi rice vinegar with: 2 tbsp rice vinegar, 2 tbsp sugar, 1/2 tsp salt.
- Mix everything together gently, as using forceful motions could mush the rice together. When you feel like the rice vinegar is evenly distributed, set it aside to let it cool down. Return occasionally to mix it around a little more to let the other pockets of rice cool down as well. During this time, you can spend it preparing the main components that will be going inside your rolls (slicing fish or vegetables). Once you feel like the rice is at a good temperature to work with, it’s time to move on to the next step.
Preparing your fillings:
This section is kind of subjective, as it really depends on what you want to put into your sushi rolls. Do you want raw fish? Cooked fish? Avocados? Thin-sliced? Thick-sliced? Feel free to play around with different ideas and combinations, as sushi rolls are a very versatile platform for experimenting. Since this was my first time in a while making sushi from scratch, I decided to keep it more on the simple side in terms of ingredients: salmon, avocado, and cucumber. To supplement that, I would use panko breadcrumbs to give it a nice crunch, sesame seeds to provide a little bit of an earthy flavor, and the spicy chili sauce that always adds that extra kick to any sushi roll.
In terms of making the spicy chili sauce, I found that the best way was to mix it in even parts first (like going with 1 tsp of Sriracha sauce to 1 tsp of Japanese mayo). From there, you can adjust to either going more spicy by adding more Sriracha or less spicy by adding more mayo. This is purely on an individual’s preference, but I usually liked to keep the sauce more on the hot side and left it at a 1:1 ratio. Using Japanese mayo is also key to nailing the flavor just right, but American mayo can also be used too. Japanese mayo doesn’t have that slight sweetness that American mayo does.
I decided to make salmon & avocado rolls three ways:
- The first roll, which you see as the eight pieces on the bottom, is just salmon and avocado slices rolled up and cut into pieces. Sesame seeds coat the outside layer of rice.
- The second roll, which you can see in the middle, is salmon, avocado, and panko breadcrumbs rolled up. After rolling, I took thinly-sliced avocados and salmon and laid it on top of the roll before cutting it. I finished it off with the spicy chili sauce and a sprinkle of sesame seeds.
- The third roll on the top was made with salmon, avocados, panko breadcrumbs, and a thin line of pure Sriracha sauce on the inside. Once I cut that up, I put the spicy chili sauce on top and sprinkled some panko breadcrumbs on there as well.
I actually also had some cucumbers julienned, but unfortunately I completely forgot to add them into the rolls. Adding that into all the rolls probably would have given it a little bit of a contrast and a cooling effect to compliment the spicy chili sauce. I’ll certainly have to add that in for next time.
Making the roll:
- Take your sushi mat and wrap it completely in Saran wrap. This will make cleanup a lot easier later and also prevent the sushi rice from sticking to the mat. Take a small bit of mayo and spread it over the Saran wrap to prevent sticking.
- To keep your hands relatively clean, wear a pair of latex gloves and spread another small dab of mayo on the gloves to prevent rice from sticking to them.
- Take out your sheet of seaweed and place it onto the sushi mat. (You can buy seaweed that is perforated to help you with sheet sizing when making the rolls). Take clumps of rice and start to spread it out onto the seaweed sheet, spreading it out to form a 1/4″ layer of rice that cover the piece of seaweed. Now would be the opportunity to add anything to the outer layer of the roll (some examples: sesame seeds, fish roe).
- Take your sheet and flip it over so now the seaweed is facing you and the rice is on the sushi mat. Line up your filling ingredients right in the middle of your sheet, lengthwise. Take one end and fold it over the ingredients lined up in the middle. Continue to fold and “tuck in” your ingredients until you’ve reached all the way on the other end (kind of like rolling up a poster).
- When you’ve completed the roll, wrap the sushi mat around it, forming a tight grip around your sushi roll. Pull at the other end of the sushi mat to compress your sushi roll even further.
- Once your sushi roll feels solid, take it out of the sushi mat and transfer it over to the cutting board. Here, I found that spreading a bit of mayo onto both sides of your knife makes cutting the rolls much easier. Trim off both ends and cut into however many pieces you’d like. A typical roll might cut into six or eight pieces. The cutting of the roll is also the time when you’d put any garnishes or sauces once it’s been transferred over to the plate.
This was really a lot of fun to do and certainly costs less than going out to a restaurant to get it. By a rough estimation, I would say that to prepare all three of these rolls cost me less than $10. I do plan to keep this post updated with links to posts of other sushi rolls that I try making in the future, so keep a lookout for them. Ultimately, you do need to invest some time into the activity, but if you’re patient, the results will pay off.
~~~~~~
Additional Rolls:
~ The M16 Roll – Inside: Cooked salmon, asparagus, avocado // Outside: Raw salmon, Sriracha mayo
Categories: Recipes

I love love love sushi, I’ve been wanting to make my own for a while!
Hope it turns out well! Don’t hesitate to let me know if you have any questions about it.