
HOMEMADE PIZZA
It all really started with me looking at the pizza dough I had bought from Trader Joe’s and wondering, “How could I make this at home?”
It took a little while, but after a bunch of experiments for the better course of a month, I think I’ve finally found an answer.
-
- My version of a “supreme” pizza: pepperoni, onions, green peppers, mushrooms, and Italian Sausage.
-

- The finished product.
-

- First pizza using the new pizza stone, Margherita style.
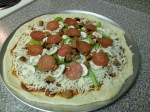
-

- Starting to get creative with the toppings.
-

- The pizza stone in action!
Homemade Pizza
Makes a 12″ pie
~ 1 package active dry yeast (0.25 oz or 1-1/2 tsp)
~ 3/4 cup warm water
~ 2 cups bread flour
~ 2 tbsp olive oil
~ 1 tsp salt
~ 2 tsp white sugar
~ 1-1/2 cups shredded mozzarella cheese
~ 1/2 to 5/8 cup pizza sauce (might vary depending on size of stretched dough)
Optional:
~ 1/4 tsp garlic powder
~ 1/4 tsp basil
The one main observation that I made in the three tries at doing this was that bread flour worked out much better than all-purpose flour. The all-purpose flour dough didn’t rise as much and the crust turned out really spongy. After switching over to bread flour, I’ve found that the crust is still soft, but has a better structure that is more like pizza you might buy from the store.
Measure out your warm water into a small bowl. I usually go with the water that feels hot to the touch, but isn’t at the point where it steams yet. This will ensure that the yeast can proof properly, where you’ll see the water turns cloudy and bubble a little when the yeast dissolves. Once you add in the yeast, let that sit for about 10 minutes.
While the yeast is proofing, we can go ahead and start to mix together the dry ingredients. Put the bread flour, salt, and white sugar together into a large bowl. The optional ingredients that I listed are ones that I use to add a bit more flavor to the dough, but definitely experiment around with other spices that you can add into the dough to give it more flavor.
After the 10 minutes is up, add in the dissolved yeast into the dry ingredients as well as the olive oil. Mix everything together and begin to knead the dough with your hands. There will likely be some stray pieces of dough sitting on the outer area of the bowl, so knead those back into the main piece and form it into a ball shape. Once you’re finished, cover up the bowl with either a lid or some Saran wrap and it’s time to let the dough rise. I’ve used two different methods to let the dough rise, so I’ll outline both of them below.
The Countertop Method
With this method, the dough will be ready in roughly an hour. The indication that the dough is ready is that it will have doubled in size, so check back on it around the 45 minute mark and see where it’s at. This was the method that I used for the bacon and green pepper pizza and I think that it turned out pretty well. The dough had the softness that I was looking for, but the crust didn’t puff up as much as I had wanted it to. I went online to read about different ways to let pizza dough rise, which brings me to the next method….
The Refrigerator Method
A really great read about the benefits of using the refrigerator method can be found at this SeriousEats post. It’s packed with a lot of detail and outlines a lot of the technical reasons about why using the refrigerator is a great place to have your dough rise. The basics of the process involve making the dough and then letting it sit in the refrigerator to rise, since the yeast will react differently when exposed to the colder temperatures. It gives the dough a little bit of a different structure, and the post outlines that the optimal timeframe to let it sit in the fridge is about 3 – 5 days.
That was my original plan when I made the dough and put it in the fridge last night, but when I saw this morning that it had already easily doubled in size, I had to adjust my plans a little bit. In total, I had let the dough rise in the fridge for about 16 hours before taking it out and leaving it on the counter for an hour to finish the proofing process before working with it. Looking back, I think that my amount of yeast will need to be scaled back if I want to leave it in the fridge for longer. With the full packet of yeast, it rose a lot quicker than I had anticipated.
Once your dough is ready to be rolled out, go ahead and preheat your oven to 400 degrees. Roll out the dough into your desired size (I’ve found that having a rolling pin really helps out with the process) before transferring it over to your oven pan / pizza pan. Throw on the pizza sauce, followed up with the shredded cheese and other toppings. The cheese / sauce amounts that I listed above I’ve found to work out well for a pizza of this size. If your pizza is going to be on the smaller end, I would maybe hold back just a bit on both of them.
Place your pizza into the middle rack of the oven, but also put an empty cookie sheet on the rack right above. This will prevent the toppings from burning before the pizza is finished cooking. Leave it in there for about 18 – 20 minutes before taking it out and letting it cool for 2 minutes.
I love that pizza is such a versatile food item where you can experiment with different toppings to suit your own tastes. It gives you the chance to flex your own creativity and make topping combinations that they might not serve at pizza places. This recipe is certainly just a starting point, but also one where I’ll continue to tweak around as I learn from future pizza making experiences!
Potential Adjustments:
- To achieve a crispier outer crust, I might try to brush the outside with olive oil before putting it into the oven. For some added flavor, I might also sprinkle some garlic powder, Parmesan cheese, and basil on there too.
- Another method to get the crispy crust might be to remove the cookie sheet and broil the pizza for 2 – 3 minutes after cooking for 16 – 18 minutes.
————
February 12, 2014 Update:
This past week, after mulling it over and doing a bunch of research, I decided that it was finally time to jump in and join the pizza stone club. I got this Old Stone Oven 14″ x 16″ pizza stone and this Ironwood Gourmet acacia wood pizza peel and got the chance to test it out for the first time yesterday evening. I was very impressed with just how much of a difference the pizza stone made.
I was able to achieve the crispy bottom of the pizza that I wanted while still retaining the softness of the actual crust itself. A previous problem that I had was when I folded my pizza slice, it would crack all the way down half the slice. With the pizza from yesterday, I was able to fold it with almost no cracking. With further experimentation and more experience, I will eventually re-write this post to include both the oven method and pizza stone methods I’ve used to cook my pizzas.
Categories: Recipes

Great stuff – making pizza at home is about the only way I can get my whole family in the kitchen at the same time!